Welcome! My goal is to aid people in creating sustainable lives, both economically and ecologically. People will make changes for varying reasons; some to save money, others to preserve our Earth. When these two reasons can come together and attain the same goal, this makes for sustainable living on a broad scale and benefits us all. Read on for a variety of lifestyle tips, product choices and projects that lead to sustainable living.

Tuesday, April 24, 2012

Two bars become one...gallon of soap!

Hey all! Lately, Pinterest has sent me on all kinds of homemade body product experiments. A few weeks ago I tried my hand at making liquid hand soap/body wash out of a bar of soap. It sounded so easy, but I managed to fail at it completely. I chalked it up to using a different kind of soap than the recipe had called for, which was Dove. I am trying to go for more natural and safer products, so I continued my search for a recipe that used a healthier soap.

I found another recipe very quickly on Pinterest, as they are certainly not hard to come by. This recipe called for the use of Mrs. Meyer's Clean Day bar soap. I looked up Mrs. Meyers on EWG's Skin Deep Cosmetics Database to see how it rated. I love and hate this site. It knows too much! I have avoided looking up some of my make-up products for fear that I will have to stop using them and start using some expensive type. But, it is helpful if you're trying to choose safe products and are ready to make a change.

Mrs. Meyer's rated a 4-5 on the database. A little too high for my liking. So, I checked Dr. Bronner's Pure Castile bar soap, which rated a 1. Bingo! I had read in the comments section of the recipe that a few people had used Dr. Bronner's with success. So, I decided this would be my second attempt and luckily, two times was a charm for me. This recipe worked perfectly and the soap is very nice. I have been using it for hand soap so far, but I plan on using it for body wash when mine runs out. I am also considering it for shampoo when that runs out, because the bar does say it is an all-in-one. I mean, I do have a gallon of this stuff, I may as well put it to good use, right?

If you prefer Mrs. Meyer's and don't care about a higher risk rating, these recipes are identical for both bars. Please note that it requires a full 8oz bar of soap. So, you may need to buy two bars of soap, as most bars are only 4oz. Dr. Bronners was actually 5oz, but I used up both bars and the couple extra ounces didn't effect anything.

Recipe:
8oz Bar Soap (I recommend using either Mrs. Meyer's or Dr. Bronner's to ensure the soap turns out correct. Using another type may not work, as I learned with my first attempt at making homemade soap.)
2 Tbsp Liquid Glycerin (Usually found in first aid section, ask an employee to help find it)
1 Gallon of water (I used tap water)
Vitamin E (optional for preservative)
 
 First, with a cheese grater, grate your soap. You can buy a grater at a thrift store or use your kitchen one. It doesn't matter since soap washes right off and adds a nice, clean shine too! This step was less time-consuming than I thought it would be, because the soap is soft and grates very quickly. 

 Next, in a large pot, add one gallon of water, 2 Tbsp of glycerin and all of your soap flakes. Heat over medium heat, stirring occasionally to ensure that the flakes are dissolving. I would recommend using a stock pot, if you have one. I do not have one, so I used my largest pot, which didn't allow me to use a full gallon of water. My soap still turned out fine, but you'll get more bang for your buck if you're able to put a full gallon of water in the pot.

 When the soap flakes are completely dissolved. Let me repeat. Completely dissolved, and no sooner, you can remove the pot from the heat. You'll have what you see above: warm, soapy water. Now, this is the hard part *wink* let your soap soup sit for a good 10-12 hours. I made mine in the evening and let it sit overnight. Do not cover the pot, so that it cools and thickens faster. I should note that 10-12 hours is not a hard and fast rule. If yours is still not thickened in 12 hours, give it a good stir with a spoon, leave it alone for an hour or two and recheck it. I read comments that stirring it a little suddenly caused it to thicken right up.

 After the wait period, it will be either the perfect consistency or thick. Mine was like a jelly, so do not be surprised if yours is as well. This is not bad! Simply use a hand mixer on low speed while adding a little more water. Mix for 30 seconds to 1 minute being sure to get all of the areas mixed. This is also the time to add the Vitamin E oil if you choose to.
     
Your soap will bubble up like a bubble bath and the consistency will become exactly like liquid soap.The soap may have a loose "snot-like" consistency, which sounds gross, but is exactly what you're going for. When you pour it, it tends to pull more soap along with it, rather than separating. You'll see what I mean in the next step.

 Using a ladle and a funnel, spoon your soap into your desired container and storage containers. I have read reports of milk gallon jugs breaking down and leaking if the soap is kept in there for too long, so I would recommend using glass jars or a thicker-walled plastic jug if you think you won't go through this very quickly. Those of you with children, or those multi-purposing this into body wash and shampoo as well, will probably go through this much faster.


Cost work-up:
1 bar of soap @ $3.29 x 2 = $6.58
6oz Glycerin @ $4.99 / 6 = $.83
1 Gallon tap water @ free

2 Tbsp of Glycerin is equal to 1oz, leaving me with 5 more oz for subsequent batches of soap. So, a gallon (128oz) of hand soap/body wash/shampoo cost me: $6.58 (soap) + $.83 (glycerin) = $7.41 total!
I don't know about you, but that is way less than I spend normally, and we're getting a healthy, natural and low-risk product too. I hope you all enjoy your soap, I know I do!

Sunday, April 15, 2012

Freezerphile: Fresh herbs

This is a start of a new series that I am calling Freezerphile, in which I share my ideas for freezing foods! Your freezer is a great tool when it comes to saving you money. You've all frozen leftovers at some point I am sure. Freezerphile isn't about freezing leftovers though. It is about how to make the most out of the components of cooking, that you'd otherwise throw away, by freezing them. This edition is focusing on fresh herbs.

If you're like me, you find that cooking with fresh herbs makes all the difference. In the summer I grow my own indoor herb garden, but the cloudy Seattle winters don't allow that garden to flourish past September. So, for 9 months (yes, it really is cloudy that long) I am forced to choose between dried herbs or purchasing fresh from the grocery store, which gets a little bit pricey to do over and over. Luckily, my local Co-op sells them in large bunches so I can usually get them for a bargain, but because it is a large bunch I can never seem to finish them all. I hate throwing out things that I love and know I'll need again in another week or two, what a waste!

Recently, I had the idea to freeze them in hopes of retaining more of the fresh flavor that you don't get from drying them. So, I gave it a go and it was a great success! The thawed leaves retained a great smell and flavor. They are not pretty like truly fresh herbs, so I wouldn't use them for a garnish. But if you're only going for flavor, then this is your method!

First, you'll need herbs and an ice tray. Later on: Water, plastic wrap and/or aluminum foil. And, of course, a freezer!

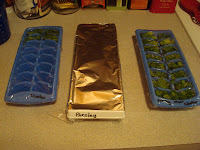
Start by washing your herbs well and shaking the excess water off. Clearly it doesn't matter if they are super dry, but it will make the next part easier if they aren't soaked. After the herbs are washed, take a seat and begin pulling off the leaves. I just pulled and snipped at my leaves with my fingers instead of going to the trouble of chopping them. If you prefer them chopped, go for it! As I pulled, I placed them in each tray, being sure not to fill above the line that the water will stop at. Make sure to label your tray. Even if you are only using one type of herb now, you may add a different type later. I used a dry-erase marker so that I can re-label later.


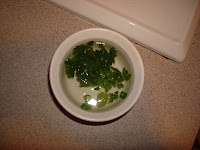
Next, pour in just enough water to cover your herbs....


....until they're all bathing nicely.


Lastly, cover them with plastic wrap and/or aluminum foil and pop them in your freezer! My freezer likes to evaporate the ice we make, and I do not want this happening with my herbs' water. Additionally, since I stack my trays, this prevents herbs from freezing to the bottom of the tray sitting on top of it. I use both plastic and foil, but I may be a little paranoid.


Once it is frozen, this is what you will get: frosty herb cubes!


If you're a good planner, you can pop a cube or two out ahead of time and let it thaw slowly. If you're like me, use the quick thaw method. In a tea kettle, heat some water but do not let it boil. Pour a small amount over the cube and it will quickly melt. Then simply drain and add to your dish!

Bon appetit!

Monday, April 9, 2012

Hand salve-ation!


Over my break from school I tried a couple of home made, natural body products. I pay attention to the ingredients in my body products, but you still never know exactly what is in there. Additionally, the organic and all-natural brands tend to be far out of my price range. EWG's Skin Deep Cosmetics Database is one way to do a background check on your products. As it shows, some are good, some are great, and some are terrifying.

The database helps me to know which products are less likely to be harmful; but making my own products gives me a bit more reassurance, costs much less and is, well, kind of fun. The first product I tried was a hand salve. I normally use hand lotion and I always thought salves were for people doing hard labor with their hands. Then I realized: I'm a student nurse, I too am doing hard labor with my hands and constantly washing them!

So, I gave it a go and I am so glad I did. The salve is amazing. It was quick and easy to make, you can customize the scent if desired, it will last quite a while because you only need to use a very small amount and, most importantly, my skin is so baby soft!

Recipe (found here):
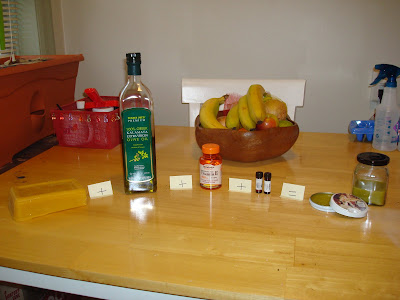
3 tablespoons Beeswax pastilles (I bought a block of beeswax and a cheese grater and grated 3 tablespoons instead of purchasing pastilles)
1/2 C Extra Virgin Olive Oil or Jojoba Oil (I used EVOO because I already had it on hand)
A few drops of essential oil for scent (optional)
1 capsule of vitamin E, cut and squeeze out liquid (optional)

Place the beeswax and Oil into an old mug, microwave for 1:20, stir while adding essential oils and vitamin E if desired. Pour into container and let harden.

See, I told you it was quick and easy! The longest part was the grating, which can be completely bypassed if you purchase pastilles instead of a block. Use this salve anywhere that needs some extra nourishment.