Welcome! My goal is to aid people in creating sustainable lives, both economically and ecologically. People will make changes for varying reasons; some to save money, others to preserve our Earth. When these two reasons can come together and attain the same goal, this makes for sustainable living on a broad scale and benefits us all. Read on for a variety of lifestyle tips, product choices and projects that lead to sustainable living.

Tuesday, June 25, 2013

Home Made It: Room Freshening Sprays

It may be the season for open windows and letting the fresh air in, but it is also not always fresh. It is hot out, which means things that smell bad in the home smell bad faster. Litter box, kitchen compost collector, you name it. Sometimes you cannot clear the air fast enough. Thus brings me to this post: home made room fresheners.

These are fast, affordable and couldn't be any easier. Plus you only need three things, and you probably already have at least two of them.

Supplies:
  • 3oz spray bottle (check the travel section)
  • Your choice of essential oil(s)
  • Water (tap water is fine to use)
How to make:
  1. Choose an oil, or a combination of oils, to use. I purchased Aura Cacia oils and their packaging gave me an idea of what to use. I also searched on the internet for other combinations. Or just experiment on your own if you are good at that. Once chosen, place around 20 drops of oil (equal number if using multiple scents) into the spray bottle.
  2. Next fill the rest of the bottle with cool water.
  3. Spray, spray, spray! If the bottle has been sitting a while since it's last use, give it a light shake before spraying.
I am pretty scent sensitive myself, but I find I can spray these like crazy with no adverse effects to my breathing. I made three different scents for various rooms of my apartment: Lavender (relaxing, bedroom), Sweet Orange and Lavender (relaxing and fresh, living room), and Sweet Orange and Eucalyptus (freshening, bathroom).

Some essential oils can be pricey, and maybe the pricey ones are the best, but I don't have that kind of money and it would take away from the "saving money" factor. I found mine in local drugstores and I also found good deals online (amazon.com) where you have a lot of options. Shop around for the best deal. Happy spraying!

Friday, May 24, 2013

Regrow It: Green onions

Wow, so after many months of not blogging I am back. My first nursing job didn't leave me much time or energy left after my shifts, so I kind of let this go. I recently switched jobs, hello 3 12's, and I am finally starting to remember what it felt like to have a life again. Thus my reappearance. My first post back is about food. I post a lot about food. One, because I love food, but also because it is one thing we all cannot live without.
 
Since it is spring, even the Pacific Northwest is getting more sunny days, it is the ideal time to do some gardening, whether it be in the backyard or your kitchen windowsill. If you aren't an avid gardener, that is okay. Regrow It is simply about taking your food scraps and setting them up to regrow more food for you. And it really couldn't be more simple.
 
Today let's talk green onions, those flavorful little guys that we can do so much with. If only we had them on hand all of the time. Well, now when you buy one bunch, you can have a self-replenishing supply on hand. Just follow these steps.
 
After slicing up the onoin, take the remainder of the onion, as shown above.

Place the 1-2 inch portion into a container, and fill with just enough water to saturate the roots. Adding too much will cause the bulb and stalk to get soggy. Place in a sunny location.

After a few days, maybe less, you will see new growth.
Until they are gigantic!


You can also plant them in dirt if you prefer. After a while, the bulbs do get soggy in a cup of water, so if you do not want to use dirt, using rocks in the cup to keep the water away from the bulb is a good option.
To use these onions, cut them just as you did the first time and replace in the water. If you planted them in dirt, you can snip them straight from the garden and they will continue to regrow. Stay tuned for future Regrow It vegetables. Happy planting.

Tuesday, September 25, 2012

Freezerphile: The overabundant Zucchini

It is that time of year again, when your friends and loved ones bring you generous, copious, seriously ridiculous amounts of zucchini from their gardens. I often wonder, why do they grow so much zucchini? Nonetheless, there it is. And you have to do something with it. I don't have an arsenal of zucchini recipes I love, but I do love zucchini bread. I also only own one bread pan for making it, along with only so much time!

This year I decided to freeze my excess zucchini to avoid wasting it. Knowing that I'd most likely just make bread out of it, I ended up shredding it prior to freezing. But really, you could freeze it in any size or shape. As some of you know, I often use ice cube trays to freeze my goods, but clearly the zucchini was too big for that. I wanted to freeze it in the exact quantity that I would need to make one loaf of bread when the mood hit. So, this is how I did it.
Measure your desired amount of zucchini. Pack tightly.

On a sheet of foil, flip the measured amount over and remove the container. The zucchini should hold its shape. Like making a sand castle!

If your foil was a rectangle shape, fold edges to change its shape into a square. The next step doesn't work well with a rectangle.

Next, bring one corner up. As you bring the next corner, create a fold between the two by folding the first corner's edge inward, while folding the new corner's edge outward. Hopefully the picture does it justice, because I know that explanation did not. I'm not so good with the words.

This is the end result of all that folding. You want it to be easily peeled away from the zucchini once frozen, without any of the shreds getting stuck inside the foil. With this technique you can just pull at the corners and it comes right off.

This is your end product. As you can see, the foil is reusable in the end and no zucchini remains stuck to it.

Don't leave your zucchini in the foil too long, as the freezer can dehydrate it. Once frozen, simply remove the foil and place it in a labeled container or bag.
Now that I've discovered this method of preserving zucchini, friends, feel free to bring me more.

Sunday, September 23, 2012

DIY It: Homemade Perfume

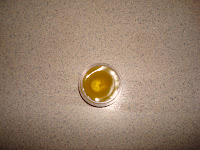
I'd say it is about time for another homemade body product post. These are always my favorite projects to try out. Today I am sharing a homemade solid perfume that I found at Crunchy Betty's site. I include the basic recipe here, but I highly recommend you check out her site for better pictures, scent ideas, and more containers for your perfume. She has amazing ideas and my photos are a bit lacklustre.

What you'll need:
40-45 drops Essential Oils per 4tsp of base (beeswax+oil)
2 tsp Beeswax, pastilles or grated from a block
2tsp Carrier oil (I used Olive, as usual)
Container for perfume (old lip gloss containers work great, the finger or stick kind)
  • First, in a separate container, blend your oils to the desired scent. It will be strong, but once blended with base, will mellow out.

  • Next, place your beeswax in a boil-able container. I used a shot glass. Then, place the shot glass in a pot of water. The water in the pot should only come halfway up the shot glass or less. Just enough to heat the glass and melt the wax. Ensure no water gets into the wax.
  • Turn on the burner to medium heat or less. Really, the wax will melt very fast, especially if you are only making one container of perfume. Once melted, using an oven glove, remove the hot wax container and quickly add your essential oils to the shot glass and mix together. The wax will harden very fast so act quickly because you do not want it to harden here.  If it does harden, just reheat briefly until melted in the pot again.
  • Last, transfer mixture to your perfume container and let harden completely, usually within 10 minutes. 


This project was extremely fast and easy, with hardly any clean-up in the end. These would make great gifts for holidays, birthdays, bridesmaids, you name it. And don't think they are just for women. Experiment with your oils and you can definitely come up with a cologne for the special man in your life too. I choose lavendar and vanilla, two of my favorites. I rub some just behind my earlobes/under my jaw bone and on the inside of my elbow and wrists too. 

The best part is these are all-natural and environmentally safe. I tend to be very sensitive to perfumes, getting headaches or respiratory discomfort easily (thank you asthma). I was searching for a better way to smell amazing without all the chemicals that commercial perfumes use. This is the answer, and the money-saving factor helps too. I hope your enjoy your hand-crafted perfume as much as I do!

Saturday, September 1, 2012

Buying Bulk the Co-op Way

Taken from anagram-press.com
One of my most loved and hated things to do is grocery shopping. I always feel good after, when the kitchen is full of food; but the repetitiveness of buying the groceries and throwing out all the packaging just gets old. Almost everything comes wrapped or packaged these days, save for fresh produce. And let's face it, some times you need exactly more or less than what the package holds. This is why buying in bulk is a great alternative. When most people hear "buying in bulk" they think Sam's Club or Costco. So, you might now be thinking, "But then you just have bigger packages." Well, today I am sharing, dare I say, the better alternative.
Grains and cereals. Taken from http://centralcoop.coop
I like to shop at my local co-op grocery store for certain items because they have an amazing bulk foods section. Buying bulk from a co-op doesn't mean the same product, in the same packaging, in a larger quantity. It means buying your foods free of packaging altogether, in whatever quantity you desire. To me, it means freedom.

They have a wide variety of grains, coffee, cereals, baking necessities, teas, oils, honey, soap, shampoo, bodywash, lotion and even water.
Coffee. Taken from anagram-press.com
Using your own container? Great! Taken from anagram-press.com
You can use their plastic bags/containers they provide for these items, but they are more than happy if you bring your own reusable container instead, as they are educated and equipped to subtract the container's weight from the scale.
 
Tea and spices. My favorite part! Taken from anagram-press.com
As with all of my posts, this isn't only about the opportunity to reduce waste by buying bulk with reusable containers, it is also about saving money. The money-saving part is really my favorite. At my co-op I can buy only what I need for right now. I can buy just a little bit of tea to see if I like it. Or just a tablespoon of that rarely used spice for that one particular recipe. This alone makes spending less money easier. On top of the flexibility is that, more often than not, buying in bulk just costs less overall. I have compared the costs and consistently found lower costs for my bulk items than their packaged alternatives.
Taken from anagram-press.com
You may need to do your homework for stores that sell bulk items in your area. I know there is one very large, well-known chain who does, but I cannot attest to the affordability of this particular store. Personally, I would recommend shopping locally if at all possible. This Co-op Directory can help you find one in your area.
A few of the many baking supplies. Taken from anagram-press.com
And don't go spending money on reusable containers, now! I reuse containers from previous non-bulk purchases: Old spice jars (glass is best, since it doesn't hold in flavors), small/medium tins for teas, and these reusable produce bags for grains (then I put them in sealing containers at home). Be creative!

Thursday, August 23, 2012

Freezerphile: Citrus zests and juices

Hello again! I took a hiatus for July and most of August. Summer has been busy. Filled with studying for and passing my board exam, becoming a licensed RN, and getting my first job as a nurse. Now that I've accomplished all of that, I have no more excuses. I have built up an arsenal of new sustainable ideas to share and I am so excited. To start off let's go straight to the ever-useful freezer!
 
As you may have guessed, I don't like to waste food, or even parts of food. So, when I have a recipe that calls for 1 tablespoon of lime zest and I find myself with 2 more tablespoons of lime zest and the juice of the lime, you better believe that isn't getting thrown out. My favorite solution is my freezer.
 
All you will need for freezing your zests and juices is a zester, a knife, and a small strainer. And of course an ice cube tray.

Simply zest your fruit until it is nice and bare and you have a good pile of fresh zest.

Add the zest in measured amounts to the individual compartments of your tray. Pick a measurement that you commonly use in your recipes. Next, add just enough water to cover your zest. No need to fill the entire compartment.

Cut the fruit in half and squeeze out the juice over a strainer, to catch any seeds or pulp. Add the juice to another compartment in the tray, but do not add water to this.


Et voila! As you can see, this works for lemons, as well as oranges or any other zestable fruit you choose. Just pop them in your freezer.
Once frozen, pop out the cubes and place in labeled containers or baggies. Or leave them in the tray. I just like freezing things and thus need my trays for future items often.
Happy zesting!

Friday, June 29, 2012

Easy, blender-free homemade lotion without water

Whoa. So, I kind of abandoned this for a while there. School got a little bit hectic, but now I am officially done and will be returning to at least one post a week of money-saving goodness. To kick off my reappearance I am going to share a recipe for homemade lotion that does not include the dreaded, organism-growing H2O. I found this on Pinterest and made it quite a while ago. I like it a lot, especially because it is chemical-free. And it smells deeeelightful without adding any scent to it.
The best part about this recipe is that you don't have to blend anything. I looked over a lot of recipes involving a blender and frankly, I didn't want a beeswax mess to clean up. This blog nailed the one container lotion. That's right, ONE container.

Supplies:
  • Pint-size or larger jar with lid
  • Grater if you are using a beeswax block instead of pastilles
  • Pot of water and stovetop
Ingredients
  • 1 cup olive oil
  • 1/2 cup coconut oil
  • 1/2 cup beeswax pastilles or shavings from beeswax block
  • 1/2 teaspoon vitamin E oil (or liquid from 5 capsules) - optional
  •  20 drops essential oil - optional
Directions
  1. Put olive oil, beeswax and coconut oil in your pint-size jar.
  2. Place the jar in the pot on the stove. Add water to the pot only, ensuring none enters the jar. The water should come 3/4 of the way up the jar. Heat over medium low heat until melted. Stir occasionally.
  3. Once melted, using a hot mitt, remove the jar from the heat and let cool completely. You can put the jar in the refrigerator to speed up the cooling. Stir the lotion every 15 minutes during the entire cooling process. You will see it progressively thicken.
  4. Once it has fully cooled, add the optional vitamin E and essential oils. Store in a cool dry place.
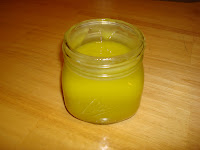
As you can see, mine is quite green. I used dark EVOO. This doesn't bother me, but if you are giving as gifts or displaying in a jar, you could use a lighter olive oil for appearance-sake. The coconut oil makes this smell phenomenal without any essential oils. Enjoy!